In this tutorial, we will learn the basics of the Cirq programming language. We will learn how to apply quantum gates and perform operations on the Cirq quantum simulators. In this tutorial, we will create a specific hello world program that creates quantum entanglement and simulates bell states.
Cirq is a python framework, so if you're familiar with IBM Qiskit, then it will be easy to learn Cirq and create quantum circuits!
You should have the latest version of Python installed in your device. Once you have Python installed, run the following command
In order to perform any quantum operation, we need to manipulate a set of qubits or quantum registers. There are many ways to define the order in which the qubits will be arranged. The following syntax will create the qubits which are the fundamental units of our quantum circuit. First, we will look at an example of the topology of the Cirq Sycamore chip(a quantum device) which is a prepackaged set of qubits.
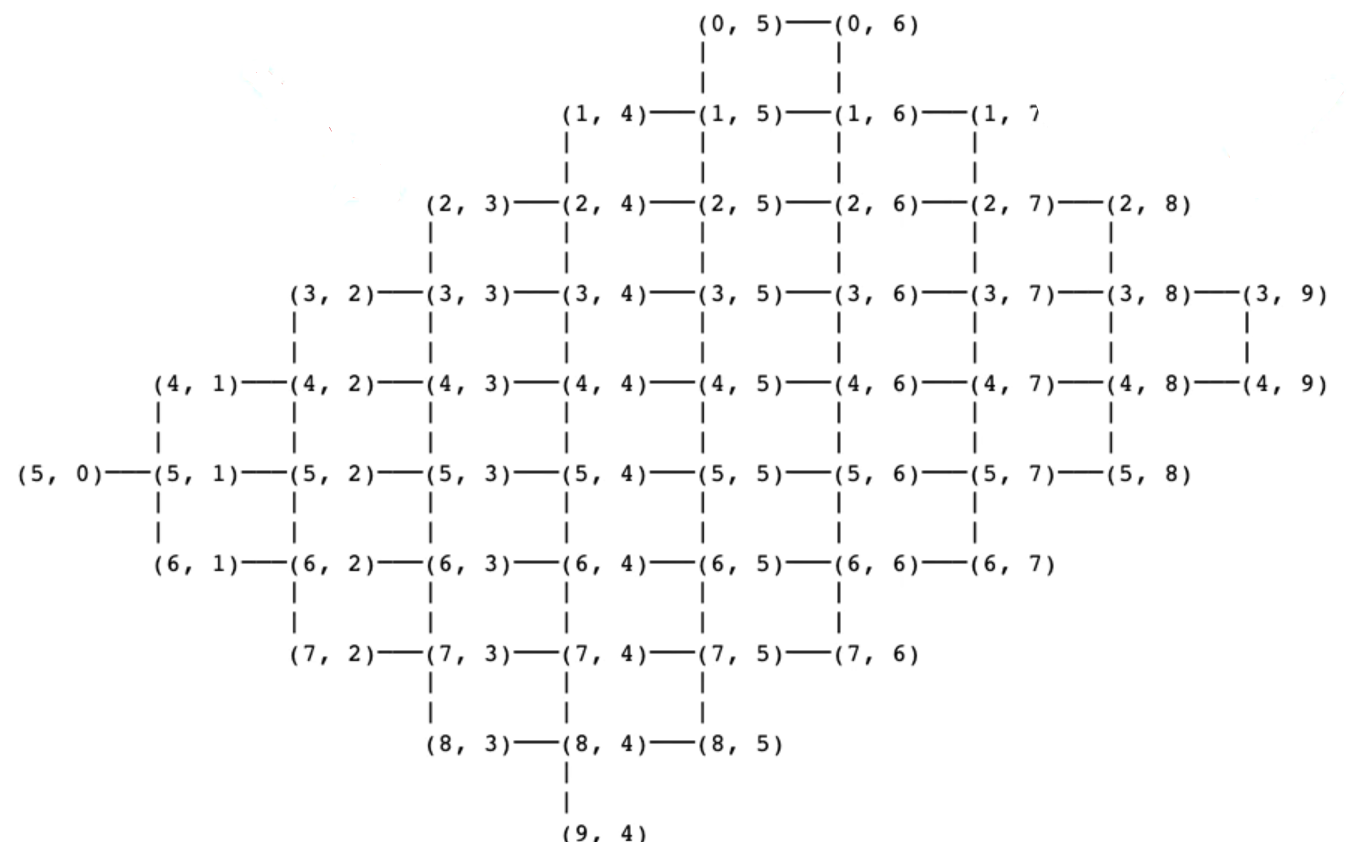
We can see two tuple pairs of numbers written at each lattice point of the grid. Each qubit is uniquely identified by a pair of two qubits in the Sycamore device.
Let's first create two qubits q0 and q1 using the following syntax
Some other ways to create qubits are
Like the AND and OR gates in classical computing, in quantum computing there are a special set of gates known as the quantum logic gates which we use to perform quantum operations or effects on the qubits
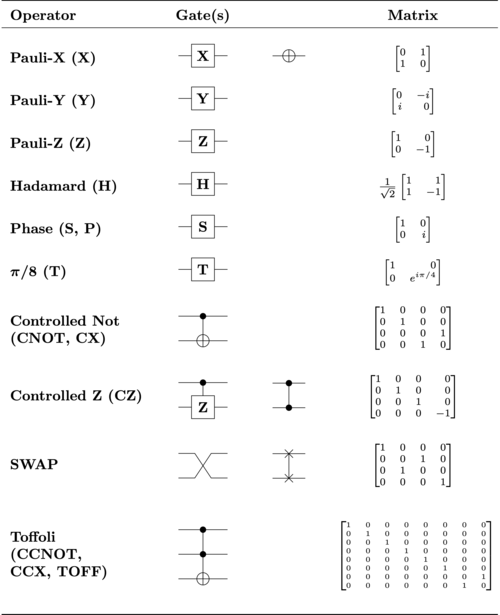
In Cirq, the main gates are the:
cirq.MeasurementGate-This is a measurement in the computational basis. This gate can be applied to a variable number of qubits.
cirq.X / cirq.Y / cirq.Z :The Pauli gates X, Y, and Z which rotate the state by one half-turn around the X,Y or Z axis respectively
cirq.CZ :The controlled-Z gate. A two qubit gate that phases the |11⟩ state
cirq.CNOT: The controlled-X gate. This gate swaps the |11⟩ and |10⟩ states
cirq.SWAP: The swap gate swaps the |01⟩ and |10⟩ states
The CZ,CNOT and SWAP are two qubit gates that act on 2 qubits, whilst the X,Y,Z gates are single qubit
In order to create superposition state of a qubit, we apply the Hadamard gate which creates an equal superposition of the states 0 and 1, or on measurement the state has a 50% chance of collapsing into state 0 and a 50% chance of collapsing into state 1. Then we will apply a CNOT gate to entangle qubits q0 and q1. When we will apply this gate, the second qubit or q1 is flipped to the opposite state if the condition that q0 is in 1 state is satisfied. We say that q0 is the controlled qubit or the qubit on which a certain condition is imposed that has to be true in order for an operation(bit flipping) to occur on the target qubit or q1.
We will create a quantum circuit in Cirq as follows that will achieve quantum entanglement and measure the output
For printing the circuit, run the following command:
The @ is the controlled qubit and the X is the target qubit
First, we will create the simulator object.
Then, we will get the result by calling the run() function.
An alternative to the syntax of creating the circuit above is to first instantiate an empty circuit using the syntax cirq.Circuit() and then append the gates using the append function. Here is how we would simulate Bell States with 1000 repetitions when running the circuit
Most quantum operations have a unique unitary matrix representation. We can access the matrix by applying cirq.unitary() which returns the unitary matrix that represents the object

We can print the moment of a circuit in time slices. A moment is a collection of operations that all act during a time interval. For example,
The output will be


